|
Registering your copy | |
|
|
1. The Register item in the Options menu. |
|
|
2. The Registration dialog box. Enter the name you receive in the Name field, and the code in the Code field. |
Outliner 1.3aFor the USR PalmPilot™ Connected OrganizerJune 25th, 1997.Copyright 1997 by Florent Pillet
|
Table of contents
- Release notes
- Upgrading from previous versions
- What is Outliner made for ?
- What are the differences between To-Do and Outliner ?
- What can I do with Outliner ?
- Shareware information
- Acknowledgements
- Quick Introduction
- The Outlines List screen
- The Edit screen
- The Browse screen
- The Planning screen
- The Preferences dialog box
|
|
|
Release notes |
|
| ||
Outliner 1.3a - June 25th, 1997.
- New features / changes
- New outlines now have the "Show numbering" option set by default.
- You can now attach/delete/edit item notes in the "Browse" view. By clicking the note symbol on items that have a note attached, note edit mode is entered.
- Going back and forth between the Edit and Browse views now always stay on the same part on the list instead of returning to the top of the outline.
- Bugs fixes
- Remembering the last position user was in when leaving Outliner works better now, though not perfect yet.
- Fixed bugs in the Export routines introduced when adding new export options. Export now works as advertised. Specifically, dates & numbering export options where interverted and didn't allow individual selection.
- A deadlock condition has been fixed when outlines are marked "Private". The software doesn't lock up anymore.
- Keboard menu item is now working in the Note view. Phone Lookup & Graffiti menu items also work on PalmOS 2.0 as well.
|
|
|
Upgrading from previous versions |
|
| ||
Upgrading to a new release of Outliner is a smooth process. Use the InstallApp application on your desktop Mac or PC and select 'outliner.prc' so HotSync will install it on your Pilot the next time you synchronize. Do not delete your previous version of Outliner! This would delete the outlines you already entered as well.
Registered users may need to reenter their registration code once they've upgraded to Outliner 1.3.
|
|
|
Read this first! |
|
| ||
Outliner lets you organize your data with a powerful hierarchy-based system. An outline can contain any number of item, which in turn can contain any number of other items, and so on. Outliner takes care of numbering the items for you, and lets you give various attributes to each item (a priority, a completion percentage, a start date and a duration or end date).
The standard To-Do application provided with the Pilot is very useful, but just not enough for most people. Many people requested the ability to create sub-categories in To-Do, but the interface is just not smart enough to handle this. Outliner was specifically designed to let you organize vast amounts of information with just a few pen taps.
Many things, in fact. You can manage tasks to do with sub-tasks, create Outlines to manage your Internet bookmarks and e-mail addresses, organize the things you have to do, prepare for a conference, training session or any other use you could imagine.
Outliner was also specifically designed to let you assign dates and duration to items, so that you can use the convenient Planning screen to quickly check what you have to do week-by-week. The way Outliner shows data was modeled after the way basic Pilot applications do, so you are not lost in new an complex concepts.
Outliner is distributed as a shareware product. If you wish to take full advantage from Outliner, you should register your copy. Unregistered copies allow you to create only 2 outlines for evaluation purposes. Outliner is only $19 per copy, with unlimited upgrades to new releases. Please support shareware!
To register Outliner, you can use the Register application that comes with the Stuffit archive (Macintosh) or Zip archive (PC). The Register application lets you choose among a number of payment methods that you pay to the Kagi service.
You can also register on the World Wide Web. Point your browser to http://order.kagi.com/?4Q. This site lets you enter your personal information and pay with a credit card or a First Virtual account.
Once you've paid for the software, you'll receive a registration name and code that you must enter in the software to register it.
In the register instructions you receive, you'll be asked to select "Register" from the "Options" menu (available in all screens in the software). Then enter the Name and Code you received from Kagi with the acknowledge of your payment.
|
Registering your copy | |
|
|
1. The Register item in the Options menu. |
|
|
2. The Registration dialog box. Enter the name you receive in the Name field, and the code in the Code field. |
Many thanks go to Michel Pollet, Bruce C. Dillahunty and Anne Samokine for their precious comments and ideas.
|
|
|
Quick introduction |
|
| ||
Outliner lets you organize things. Basically, you create Outlines in the Outlines List screen, then fill each Outline with items. Each item is automatically numbered, and you can nest items up to 8 levels (which is the limit for numbering) or more if you don't care about numbering.
For better ease of use, Outliner provides you with three ways to work with your outlines: the Edit screen, the Browse screen and the Planning screen.
|
Three different ways to view the contents of an Outline. | |
|
|
The Edit screen has a 'flat' representation of the outline's contents, which lets you more space for text input. Note the hilited button in the bottom right of the screen, indicating on which screen you are (Edit, Browse or Planning). |
|
|
Selecting an item and tapping the Go To button opens the Edit screen and places the insertion point at the end of the text of the selected item. Tapping an expansion triangle on the left expand or collapses an item (shows or hides its contents). |
|
|
Diagonal stripes filling indicates parent items. Gray filling indicates child items. |
|
|
|
|
|
| ||
Launching Outliner brings the Outlines screen. It lists the Outlines in the Outliner database by category. Only Outlines can be categorized, not sub-items (this would be too error prone). Here is an example Outlines list screen:
The Outlines List screen

Tap thebutton to enter the Edit screen for the currently selected item.
Tap the
button to enter the Browse screen for the currently selected item.
Tap the
button to enter the Planning screen for the currently selected item.
Tap the New button to create a new outline.
Tap the Details button to change the Category and Private checkbox of the current outline.
As in To-Do list, you can change the current category by tapping the upper-right corner corner of the screen (the 'All' word). This also lets you edit categories.
Each outline takes up one or more lines in the list. Clicking in the text field allows you to change the name of the outline. Tapping the icon enters Edit mode (as does tapping the
button). Tapping the
button enters Browse mode, where you can visualize the contents of your outline in an indented format but not change the text. Tapping the
button enter the Planning screen, which shows due tasks in an outline, week by week.
Note that before tapping any of the buttons, you must tap the text field of the desired outline so it becomes selected. The buttons act on the selected outline.
Tip:
Tap the note symbol column to attach or edit a note.
Tap the icon on the left to edit an Outline, instead of selecting the item then tapping thebutton.
The menu bar in the Outlines List screen has Record, Edit and Options titles. The Edit title is common to all Pilot applications, and the Options title only contains the About Outliner and Register commands. For details about registration, please refer to the Registration Procedure.
The Record menu
To duplicate an outline (thus creating an exact copy of the outline with its contents), select Duplicate Outline.To delete an outline, select Delete Outline then confirm in the alert box.
To attach a note to an outline, select Attach Note.
To delete a note attached to an outline, select Delete Note.
To create a new MemoPad item with the contents of the currently selected outline, select New Memo From Outline. The Memo Pad item will contain all items in the outline, but not the notes attached to the items nor the completion status and dates.
When you select New Memo From Outline, a dialog box shows up. Default goes to Text export, which is a simple export with spaces used to show indentation. You can select 'Txt/tabs' to have spaces replaced with tab characters, or HTML to have Outliner generate a HTML page from your outline. Once exported in HTML format, synchronize with your desktop computer, save the content of the MemoPad item in a file and import it in any application able to import HTML files (recent word processors know how to do that).
Starting with release 1.3 of Outliner, new options are available. You can include the numbering, dates and notes in the exported item. If the resulting MemoPad is bigger than 4000 characters, a second item is created with the title 'Continued from previous item' and the export continues in this item. As many items are created as necessary. This was done because of the 4k text size limit in MemoPad.
|
|
|
|
|
| ||
The Edit Screen is were you'll do most of your work in Outliner. For internal reasons, it was not possible to merge the Edit and Browse screen in one single screen, and it would not be convenient (very deep items would have a small width for text input, which could be annoying).
The Edit screen

As you can see in this example, the Edit Screen presents a "flat" view of an Outline, and only the expansion triangles on the left show you that items have sub-items.
Creating items
To create a new item, click the
button. This creates a new item at the same level, and below the currently selected item. If no item is selected, the new item is created at the end of the Outline, at the first level.
Moving items around
Once you have created an item, you can make it the children of the preceeding item, move it to the same level as its parent item, move it up or down one line in the same level.
Moving items around

Move up to parent level
Move the selected item (and all its sub-items) to the same level as the item's actual parent.

Make it a child
Make the selected item and all its sub-items a child of the preceeding item in the list. If there is no preceeding item, do nothing.

Move up by one line
Move the selected item and all its sub-items up one line in the current level. If the item is already the first child, do nothing.

Move down by one line
Move the selected item and all its sub-items down one line in the current level. If the item is already the last child, do nothing.
Numbering items
Items numbering is automatic. Items at the first level are numbered 1., 2., 3., etc. Sub-items for each level are numbered starting from one, preceded by their parent's number (1.1., 1.2, 2.1, 2.2, 2.3, etc). You can tap the number column to change the numbering scheme for all items at the same level in the outline. For example, taping the '1.' of the 'Pilot related sites' item shows the numbering selector. If you tap 'a', numbering changes to a., a.1, a.2, a.3, b., b.1 as shown below.
Changing items numbering

This is the numbering pop-up that appears when you tap the numbering column.
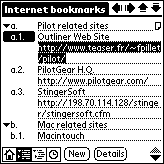
After tapping the '1.' number on the first item in the list and having choosen 'a' in the numbering pop-up menu, the screen is updated to reflect the new numbering.
Completion percentage
Each item has a completion percentage, which you can use or not, depending on what kind of data you store in your Outline. To show or hide the completion percentage column, please read the Preferences paragraph of this manual.
If you tap the 'Completion Percentage' checkbox in the Preferences dialog box, you'll see a little empty rectangle in front of each item. Tap this square, then select a percentage reflecting the status of this task: the little square fills with enough black to represent your percentage. Thus, you can manage complex tasks and immediately check what is the status of each one.
Note:
There is something very specific with parent items. You can't change a parent item's completion percentage: it is automatically recalculated from its children's percentage, showing you an average of the completion percentage of all its sub-items.
Changing the completion percentage
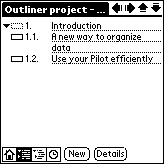
The little square in front of each item represents the completion percentage of the item.

Tap in the square to open the completion percentage pop-up menu, then select a percentage.
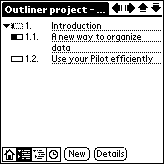
After changing an item's completion percentage, the item's square is redrawn and the parent's global percentage is recalculated. Note that the global percentage is averaged from the percentages of all the sub-items.Start Date and End Date
Each item in an Outline can have a Start Date and a End Date. The End Date can be edited as a date, or as a duration from the Start Date which can be useful when managing projects.
To change the Start Date or End Date of an item, you must tap the
button after selecting an item. This opens the Details Dialog box, shown below.
To change the Start Date, tab the date in front of the Start Date label. If no date was defined, the text reads "No Date" and the End Date label is hidden.
As soon as you have defined a Start Date, the End Date label appears along with a date selector for the end date. If you chose 'End Date as Duration' in the Preferences dialog box, the Duration label is shown instead.
The Details Dialog Box: Editing dates

The details dialog box with no Start Date defined.
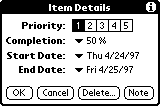
Once you choose a Start Date, the End Date label appears.Note that if you tap the End Date label, the End Date is replaced with a duration field. You can use whichever suits your needs.
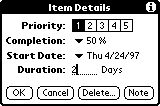
After tapping the End Date label, or if you choose 'Edit End Date as Duration' in the Preferences dialog box, the End Date is replaced with a Duration field.
The Edit Screen Menus
There are three menu in the Edit Screen's menu bar: Record, Edit and Options. The Edit menu won't be detailed here, since it is a standard Pilot edit menu, as in all other applications.
Here are snapshots of the Record and Options menu, along with explanations of what each item does.
The Edit Screen Menus
The Record menuNew Promoted Item creates a new item and makes it a child of the currently selected one.
New Demoted Item creates a new item at the same level than the currently selected item's parent.
Delete item deletes the currently selected item.
Attach Note creates or edits a note for the currently selected item.
Delete Note deletes the note attached to the currently selected item.
Expand All and Collapse All expand or collapse all the items in the outline.

The Options menuPreferences opens the Preferences dialog box.
About Outliner shows information about the software.
Register allows you to enter your registration code when you've paid for Outliner.
|
|
|
|
|
| ||
The Browse screen allows you to browse an Outline in indented format, just as it should be. For technical reasons, and to let you more space for text input, the Edit screen does not present data in indented format.
With the Browse screen, you have a much better view of the data in an Outline. You also have access to the arrows allowing you to move items around, just like in the Edit view.
Note:
The Browse screen only displays the first line of each item, so that you have a compact view of your Outline.
The Browse Screen
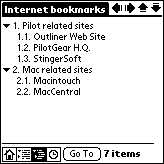
Tap the Done button to go back to the Outlines list.Tap the Go To button to enter the Edit screen, and edit the selected item.
The counter at the bottom of the window shows you how many items there are in your Outline.
Use the arrows to move items around, just like in the Edit screen.
Tap the expansion triangle to expand or collapse an item.
Tap the note symbol to access the notes for an item.
Use the Attach Note/Delete Note menu items to attach or delete a note to an item, just as in the Edit screen.
|
|
|
|
|
| ||
For easy project management, you can enter Start Dates and End Dates/Durations for items. This would not be very useful is you did not have a week view, like in the Pilot's Date Book, to see what you have to do during a given week.
The Planning screen shows you, week by week, tasks to do for the selected Outline. Activating the display of priorities and completion percentages in the Preferences dialog box make them appear in the Planning screen as well.
Each line in the Planning screen shows as much of the text of the item as possible. Tap the item to enter the Edit screen. Tap the
button to enter the Edit screen, starting at the first item. Tap the
button to enter the Browse screen, starting at the first item.
If you have more tasks that can fit in the screen for a given week, two scroll arrows appear in the bottom right corner of the screen. Tap the arrows to browse all the tasks.
To change display preferences, tap the menu icon on your Pilot and select the Preferences item in the Options menu.
The Planning screen
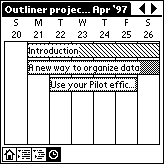
Here is an example Planning screen without priorities nor completion percentages.

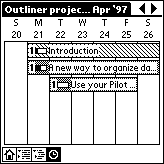
Here is an example planning screen with priorities shown (go to the Preferences dialog box to activate priorities).
After tapping the End Date label, or if you choose 'Edit End Date as Duration' in the Preferences dialog box, the End Date is replaced with a Duration field.
|
|
|
The Preferences dialog box |
|
| ||
From the Edit, Browse and Planning screen, you have access to the Preferences dialog box which allows you to set display and input preferences.
Starting with release 1.3 of Outliner, each outline now has its own preferences set. This means that you can assign different display options for different outlines.
The Preferences dialog box
To display priorities, tap the Priority checkbox.To display completion percentages, tap the Completion Percentage checkbox.
To display items numbering, tap the Numbering checkbox.
To display End Dates, tap the End Date checkbox.
Selecting End Date or Duration displays the appropriate information in the Details dialog box for each item.